Blog How to Create a Notion Template (Step-by-Step Guide)
How to Create a Notion Template (Step-by-Step Guide)
Discover the simple process of converting any Notion page into a template to streamline your workflow. Follow this step-by-step guide to create effective and efficient templates.
Notion is a powerful tool that helps you organize your life, work, and ideas in one place. One of its best features is the ability to create templates. Templates save you a lot of time by letting you set up common layouts and content just once, so you don't have to start from scratch every time you need a similar page or database entry.
Using templates means you can keep your Notion workspace consistent and efficient. Whether you're tracking projects, taking notes, planning content, or managing tasks, a well-made template can make your workflow much smoother. It helps ensure you capture all the important information every time, without forgetting key details.
Learning to create your own templates unlocks the full potential of Notion, allowing you to tailor it perfectly to your unique needs. You can build systems that work exactly how you think and operate, making your daily tasks easier and more organized.
So now let’s get started.
8 Steps to Create a Notion Template
Creating your own Notion templates is a smart way to boost your productivity and keep your workspace tidy. By following these steps, you'll be able to design and use custom templates that fit your exact needs.
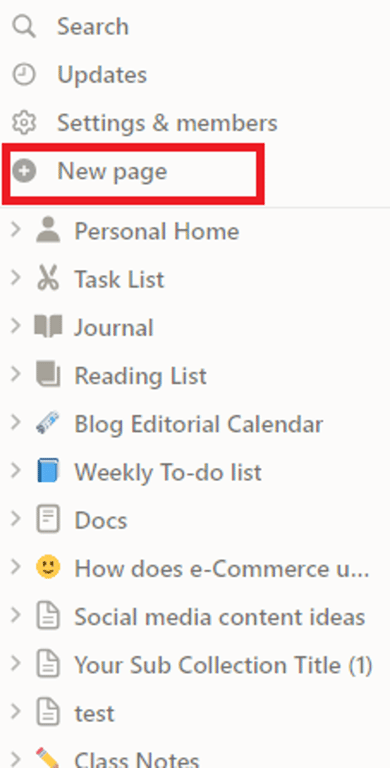
Step #1: Start with a New Page or Existing Content
To begin, you can either create a brand new Notion page or choose an existing page that you want to turn into a template. If you start a new page, open Notion and click on the "New Page" button in the sidebar, or simply type `/page` and press enter in an existing block.
Give your page a clear title that describes its purpose, such as "Meeting Notes Template" or "Project Plan Template." If you're using an existing page, navigate to it in your workspace. This page will be the foundation for your new template.
Tip: If you’re new to Notion, try starting with a pre-existing template from the Notion library for inspiration.
Step #2: Customize your Template
Once you’ve created a new page, it’s time to personalize it. Think about what you want the template to do. Do you need headings, checkboxes, or tables? The goal is to structure the template based on its intended purpose.
For instance, a team manager might create a meeting notes template specifically for tracking their team’s work updates.
The beauty of Notion is that you can mix and match elements like text, images, tables, checkboxes, and more, to tailor the template exactly how you want.
Step #3: Add Blocks for More Functionality
Notion allows you to add various types of blocks to your templates, such as text, images, videos, and even code snippets. For example, in a meeting notes template, the agenda can be added as a block to make it stand out and easy to reference.
These blocks act as building blocks for your content. If you want to include embedded files, videos, or other media, simply drag in the appropriate block and drop your content inside. This level of customization makes Notion an ideal tool for users across various fields, whether you’re in marketing, project management, or education.
Step #4: Pre-Populate content
One of the best things about Notion templates is the ability to pre-populate content. This means you can include information that is consistent across all templates, saving time and avoiding repetition.
For example:
For a meeting notes template, you could pre-fill the date, location, and meeting title, so users don’t have to input this information every time they use it.
Pre-populating content is a great way to make your templates more user-friendly and efficient.
Step #5: Configure Properties
If your template is going to live inside a database, you can configure properties like status, priority, or tags. This step is crucial for project management or task-tracking templates.
These properties allow for filtering and sorting, which make it easier to manage and track progress. For example, in a meeting notes template, you can filter the database based on “Attendees”, “Created by”, and “Meeting Types”.
Step #6: Duplicate the page to create a template
Once your page is ready, you’ll need to make it duplicable. To do this:
Click the three-dot menu in the top-right corner of your page.
Select "Duplicate". This will create a fresh copy of the page that you can use as a template.
Now, you have a functional template that can be reused again and again.
Step #7: Using the Template
When you want to use your template, simply duplicate it again. The duplicate will function as an independent page, leaving the original template untouched.
This is where the power of Notion’s templates really shines. You can keep your original template intact while creating customized versions for different projects or needs.
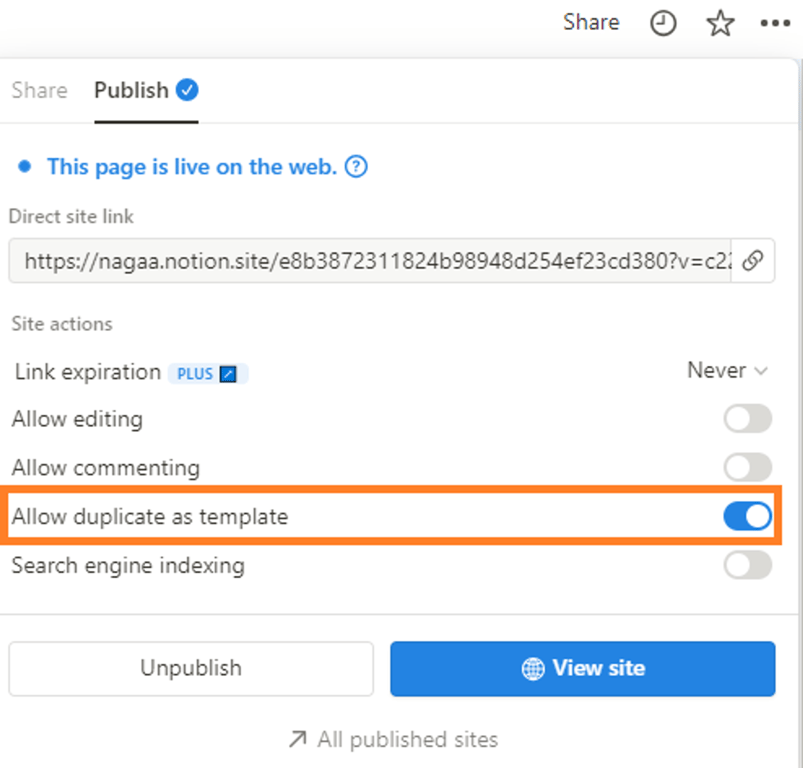
Step #8: Share & Collaborate
To share your page as a template with your colleagues or anyone on the web, click 'Share' at the top right, then click 'Publish' and 'Publish to web.' Enable 'Allow duplicate as template', copy the link, and share it. Future users can duplicate with the updated info as you edit.
How to submit the template to Notion
To submit a page as a template, start by publishing it first. Follow the above step 8 to complete the publishing process.
Go to Notion guide page to submit your template. Click the “Submit A Template” button to open the submission form.
Provide your answers, and on the 'Public URL' page, copy and paste the note URL from the Notion publish section.
Fill out and submit the form. The Notion team will contact you for any updates.
Advanced Features: Level Up Your Templates
Once you’re comfortable creating basic templates, why not take it to the next level? Notion offers powerful features to enhance your templates.
1. Using the Notion Template Button
The Template Button is a super useful tool for creating repeated structures within your Notion page. For example, if you need a custom client pitch, click the button, and it will automatically generate your client pitch!
2. Creating Nested Templates
You can also create templates within templates. For instance, inside your project template, you could add a “Task” template button for recurring tasks. This is useful when organizing larger workflows.
Nested templates are especially useful when you're building advanced systems like a Notion-based CMS for blogging or documentation.
Conclusion
Creating Notion templates is a fantastic way to boost your productivity and bring more consistency to your digital workspace. By following these simple steps, you can design custom templates for anything from daily tasks to complex project plans.
This skill will save you countless hours by eliminating the need to recreate pages from scratch and ensuring that all your important information is captured in a structured way. Experiment with different layouts and features to build templates and sell templates so that you can own your site.
 Made with Bullet